This was our process of turning a dark, dingy, Northeast fieldstone basement into a warm, bright, livable area.
Step 1. Make a Plan
Not strictly necessary — you could just dive right in — but I wanted to showoff my Google Sketchup pictures:
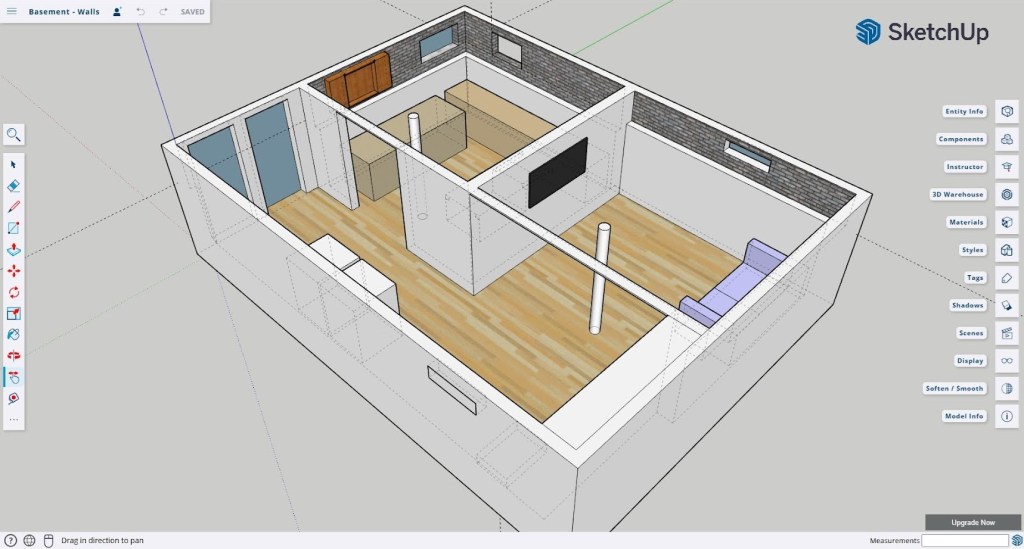
In our case, we wanted three main areas: a den, a workshop, and a laundry. The constraints were three columns, some glass block windows, sewer lines around the perimeter at various heights, and a staircase.
Step 2. Address Moisture
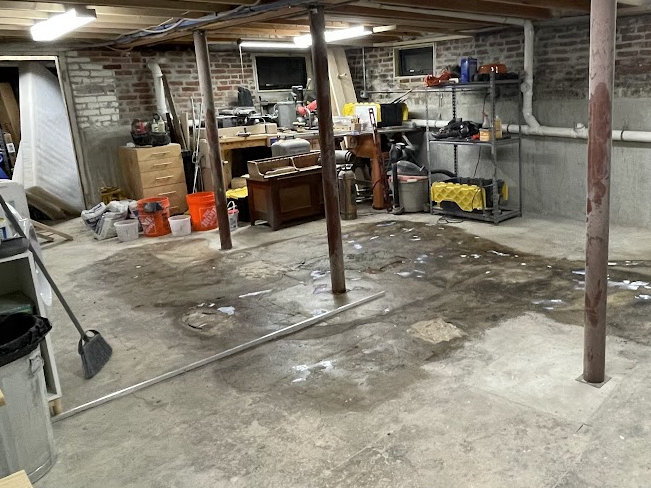
The first step of any basement renovation is to address water issues. We’d lived in the house for many years, through many heavy rains, so we knew where the problems were, and they weren’t too bad, thankfully. So for us this meant (1) adding concrete foundation around certain parts of the house; (2) extending downspouts away from the house; and (3) covering the flagstone interior of the basement with stucco. Here’s a photo of how the walls looked before the stucco:

And here is the after:
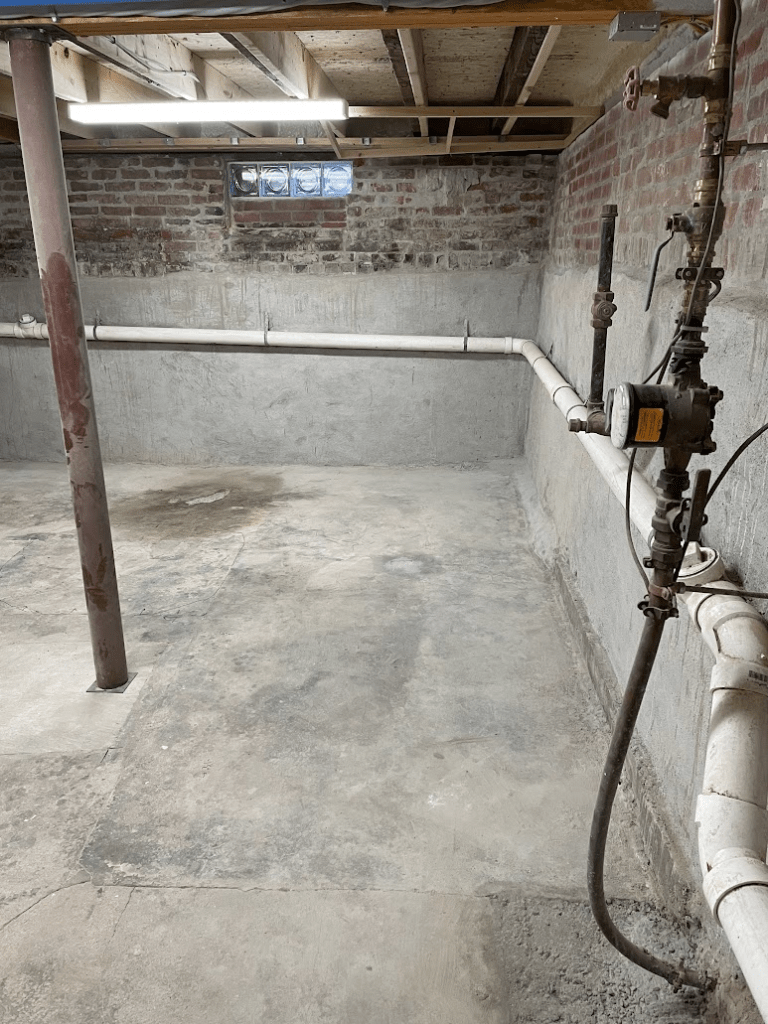
Note the stain on the floor above and on the bricks in the “before” picture is not water – it’s oil, from a massive oil tank that was removed when we switched over to gas.
I’m not sure this stucco step was strictly necessary, but it felt like reasonable extra insurance. And we did not do this work ourselves – it was one of two tasks for which we hired professionals.
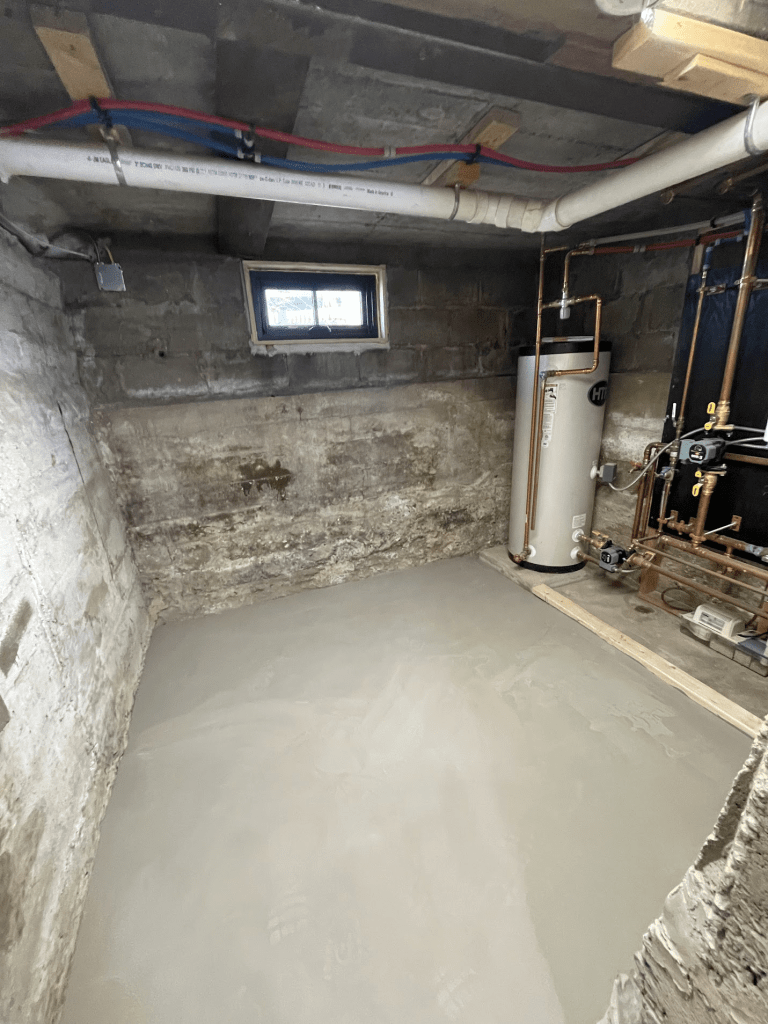
Step 3. Get the Floor Reasonably Flat
The next step was to fix up the floors. This meant patching a few bare dirt spots with concrete and then getting it reasonably smooth and flat. In this step, I fell in love with self-leveling underlayment. But I get ahead of myself. As I said, the first step was patching bare dirt spots with concrete. You can see one patch in the lower-right corner of the picture above, where the water main is coming up.
The next step was many iterations of self-leveling underlayment. This itself is a two-step process each time you do it: spreading adhesive, and then pouring the underlayment. I started in the lowest spot (the middle), and worked my way out. Here’s what it looks like when you slather on the adhesive:
And here’s what it looks like when you pour on the underlayment:

Without exaggerating, I probably did this about 32 times. Each layer probably only added 1/8th” of an inch. In the end, I didn’t go for level. I went for flat enough that you don’t notice.
As I mentioned before, I like this underlayment even if you never cover it with flooring. For example, in the unfinished utility closet in the back of the basement, we had a nasty and unlevel concrete floor. A quick coat of the underlayment made it much more pleasant:
It seems to me you get close to a very smooth concrete floor without all the hassle – you just pour it.
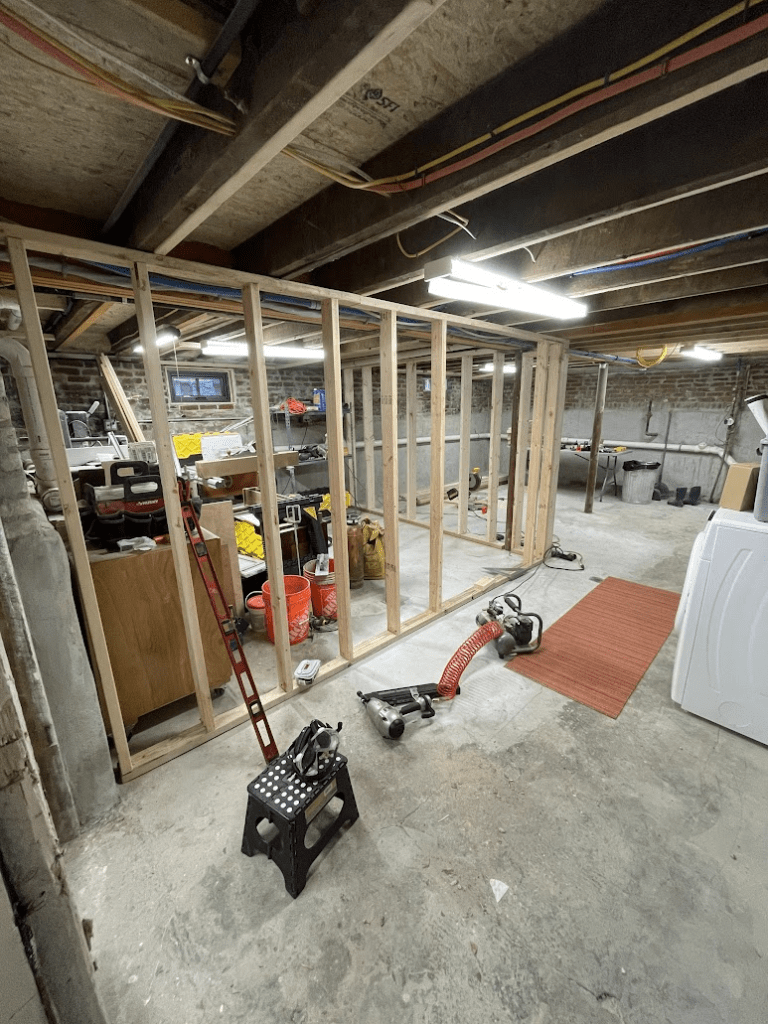
Step 4. Framing (by far the most rewarding step)
Once the floor is in good shape, you can begin framing. This step is ridiculously rewarding compared to many other steps, because once you get the hang of it, it goes quickly, and suddenly you have walls and rooms.
Picking the right starting wall is important as a reference point, and there are all sorts of YouTube videos for getting your walls square. In my case, I began with the wall that separated the den from the workshop, because I knew I could simply line this up with the floor joists above, and use it as a reference for the other walls. Here’s the beginning of that wall:

To get the wall straight, I attached the top plate first, hung a plumb line from it to the floor, and then put the sill plate at that plumb line, attaching all sill plates to the concrete with this Ramset gun. The sill plates are all pressure-treated and the rest is standard lumber.
To have this wall completely encapsulate the column, which is about 4 1/2″ in diameter, it is made from 2x6s. All the other walls are made from 2x4s.
I moved on to the adjoining wall that surrounds the workshop, just a regular wall with a large 4′ opening for a future sliding barn door to get workpieces and wood in and out:
And then started to make my around the 3/4 walls around the perimeter:

These 3/4 walls were essentially a design choice, to leave the exposed brick, allow for a long, wide shelf along the perimeter of the room, and generally make things a little less boxed in.
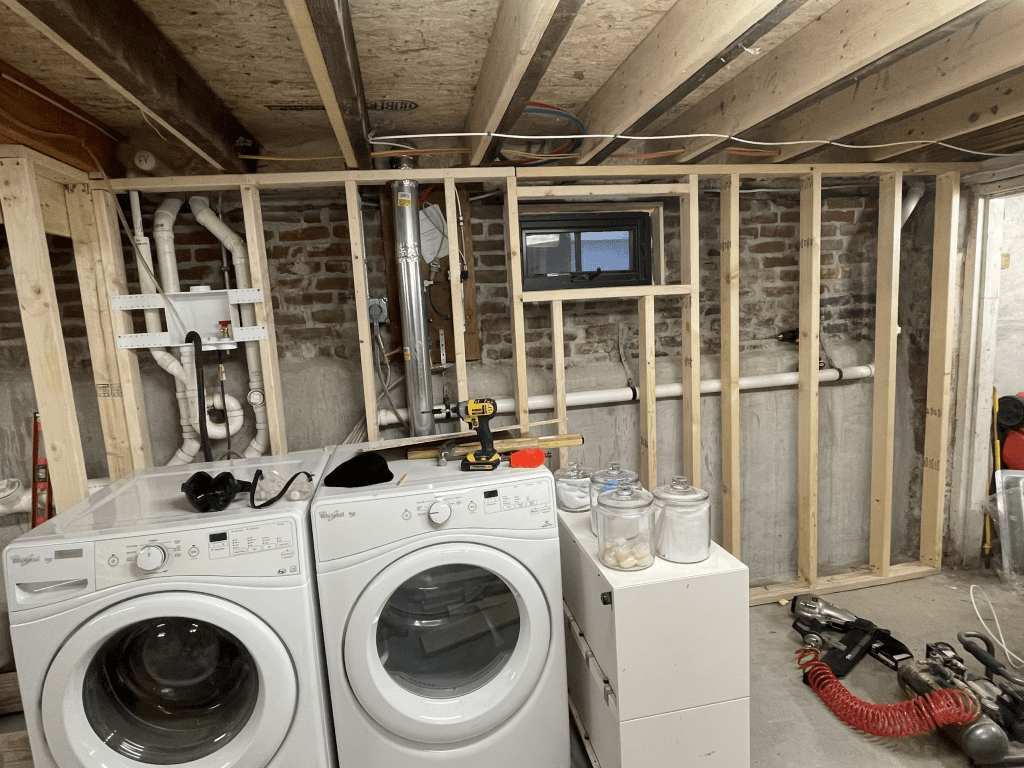
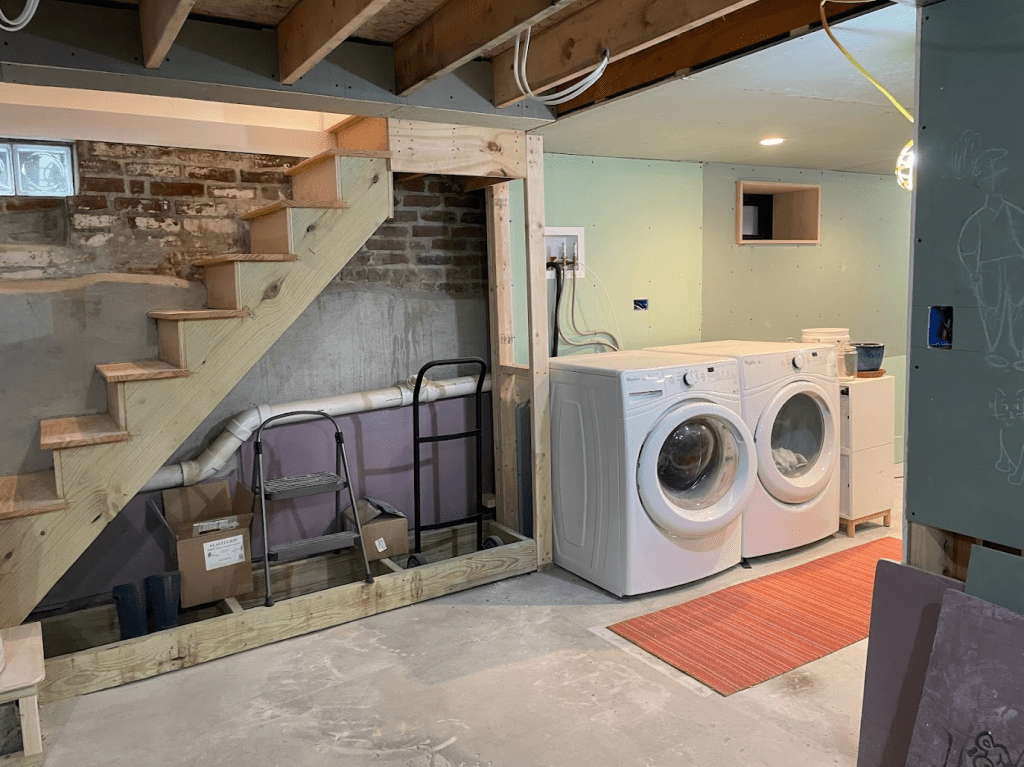
Framing around the laundry wall was a bit more complicated, with a dryer vent, recessed window, and hoses to deal with. Installing a laundry box and a dryer vent box (not seen) helped organize things quite a bit:
Bonus Step 4. Frame for Built-Ins
As a woodworker, I knew I didn’t want boring IKEA cabinets for storage. I wanted custom-fit built-ins. Knowing this in advance allowed me to frame things with the built-ins in mind. I made two sets. The first set was a group of cabinets to occupy the unused space above the sewer line and to hide the water main. Here’s the initial framing:

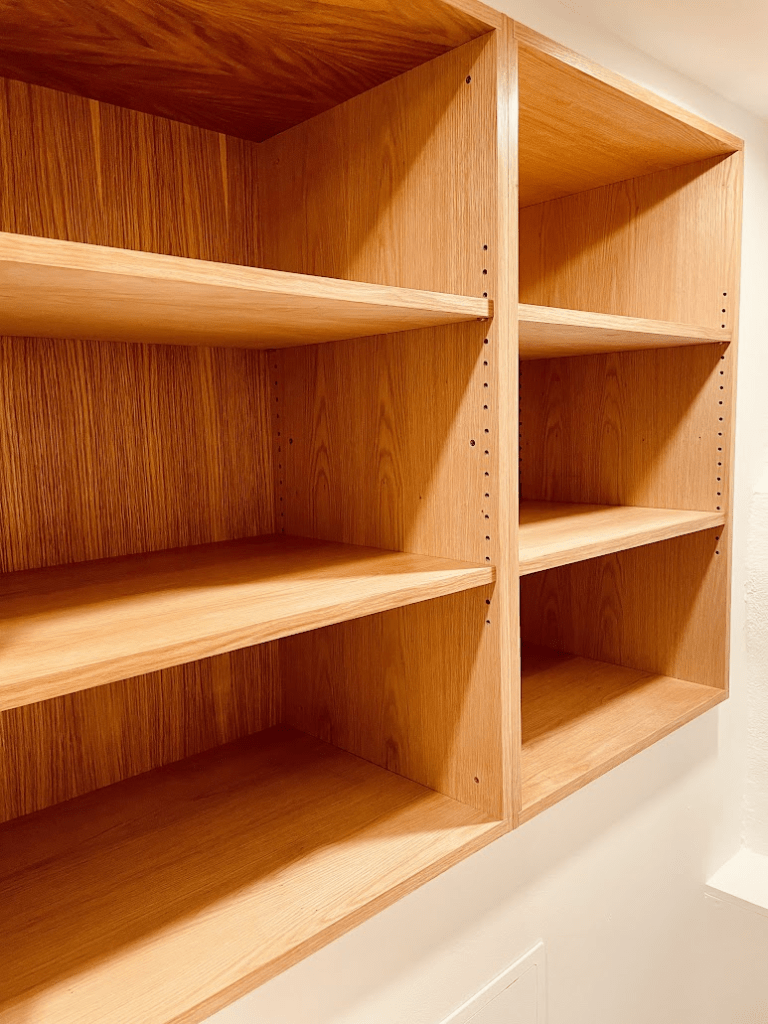
And here’s the result: four white oak cabinets with open shelves and the water main behind a door:
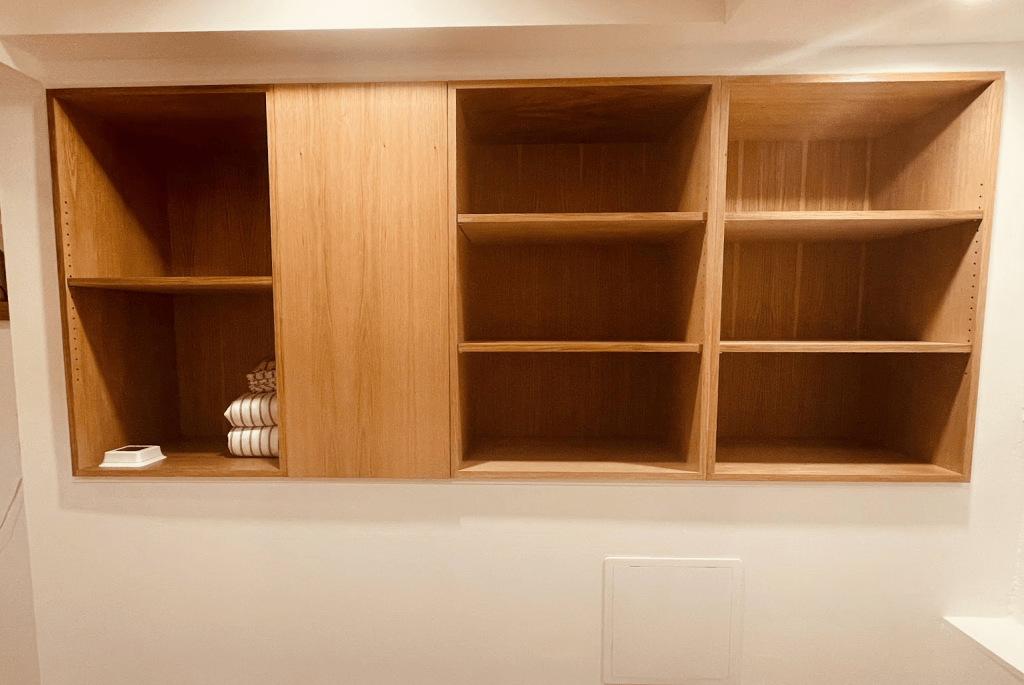
(You can also see the access panel in the drywall below to get to the sewer line cleanout.) I could write a whole entry on building these, but for now, the before/after will have to suffice. A final shot of the shelves from another angle:
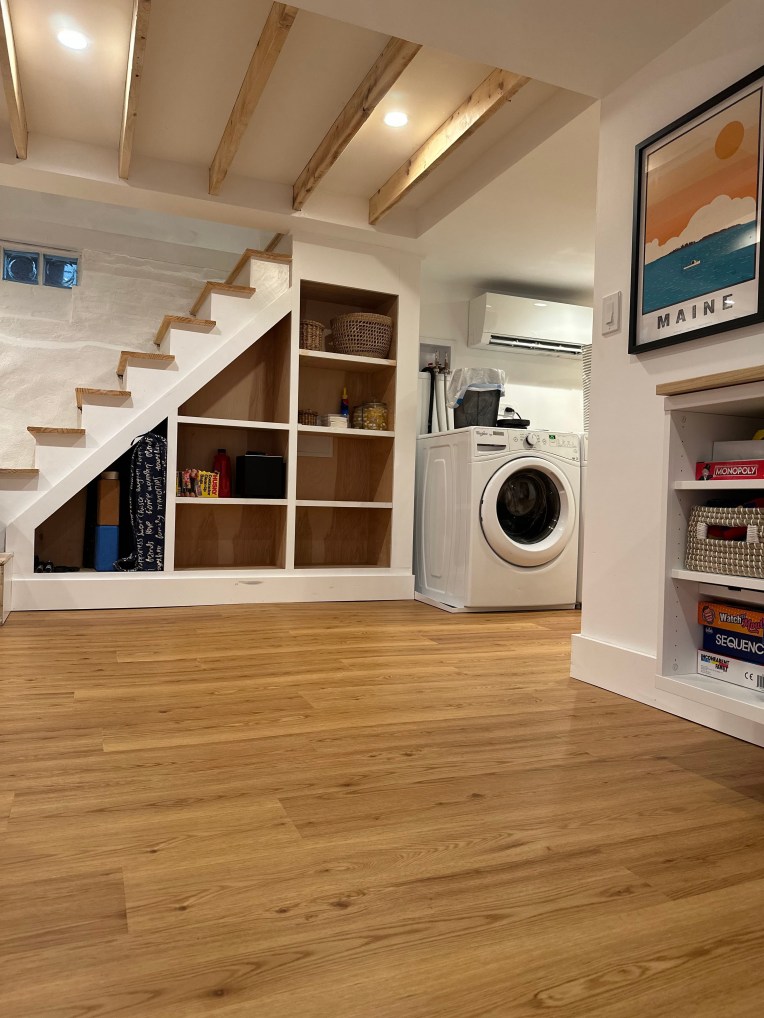
The second set of built-ins was about making the most of that tricky under-stairs area. I iterated on a few ideas for this one, including closed cabinets, drawers, and so on, but landed on the simplicity and airiness of open shelves, which I recommend for a basement. Again, here’s the framing — pretty simple, in this case, comprising just some pressure-treated 2x6s set level on the decidedly unlevel floor and a few studs along the right side:
And here’s a shot of an intermediate step — essentially, three plywood boxes siting on a pressure treated base frame:

I built the boxes separately, then put them in place, and clamped and screwed them together so that they are all square to each other. This was the trick I learned from Tom Silva on Ask This Old House for built-ins: assemble units separately, then attach together, then make sure the whole unit is level when you install. Here’s the result, trimmed out with face frame and baseboard:

In this case, I choose inexpensive birch plywood interiors and a painted face frame to match the rest of the trim. I think this produced a nice effect.
Step 5. Rough Electrical
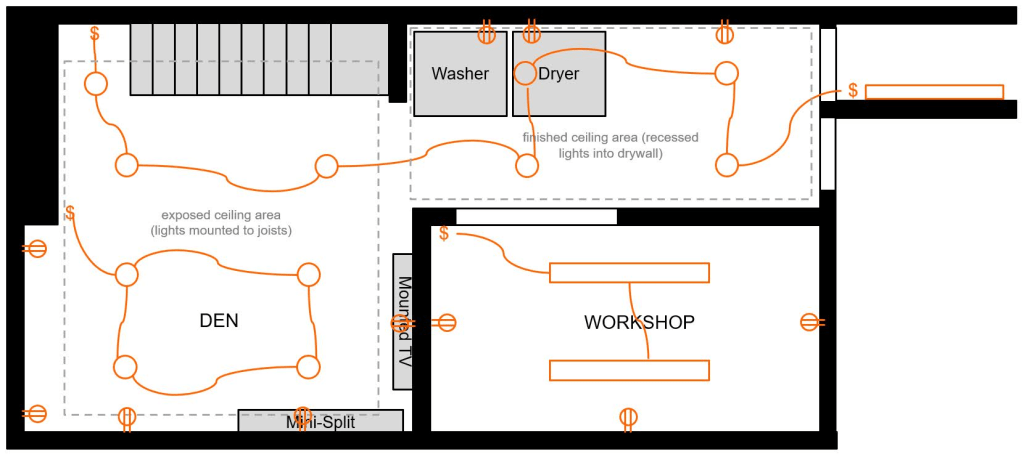
This was the second thing for which we hired professionals. I took one look at the “Black and Decker Complete Guide to Wiring” and my woodworker’s brain shut down. I did at least provide them with this diagram after learning the little symbols for outlets and light switches:
Step 5. Drywall
I don’t know what to say about this step, other than it’s tedious (but not as tedious as the next step). You hang the drywall.
I will, however, talk about one design choice that was painful at the time but worth it in the end, which was to have the floor joists exposed on the ceiling in two of the areas, which meant a lot more drywalling complexity. Take a look:

This doesn’t achieve much in terms of additional ceiling height, but it adds a nice detail and feels airier, and it allowed for the lights to be recessed within the joists, which highlights the wood nicely. Here it is with drywall finished and joists sanded (the more utilitarian laundry area beyond just has the regular drywall ceiling):

If you’re interested in recessing the lights within the joists like that, you simply need to attach some 2×2″ wood cleats to each side of the joists, so that you can then screw the drywall to those cleats. I don’t have a picture, but you get the idea. If you’re putting drywall between the joists, you need to hang those cleats regardless of whether you’re putting in recessed lights, because you don’t want to be screwing drywall directly into the subfloor above!
Step 6. Mudding and Painting
This step took forever and fortunately brother-in-law did the vast majority of the mudding, and my wife did all the painting. Here’s a progress picture towards the end of the painting:

The brick got cleaned and painted white, too, with some special paint. Painting everything white significantly helped brighten things up.
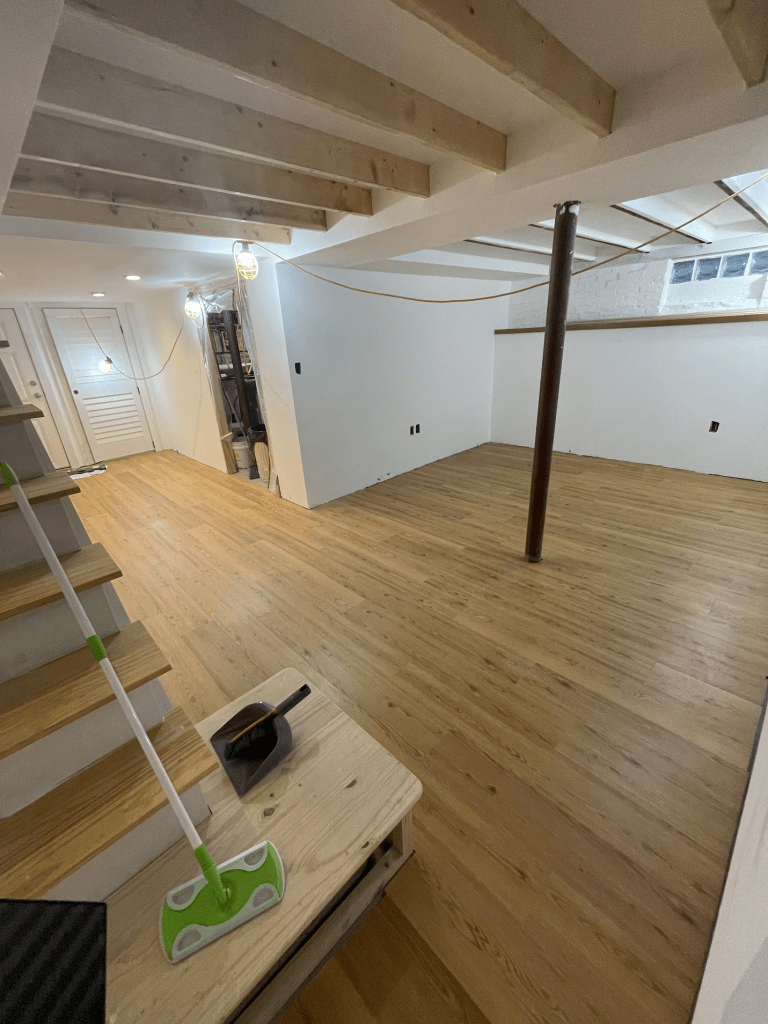
Step 7. Flooring
Things really come together when the floor goes down. We choose a wood-look LVP (luxury vinyl plank), sticking with the oak theme to match the built-ins, with a good cushion to try to mask any imperfections. Here it is in progress:
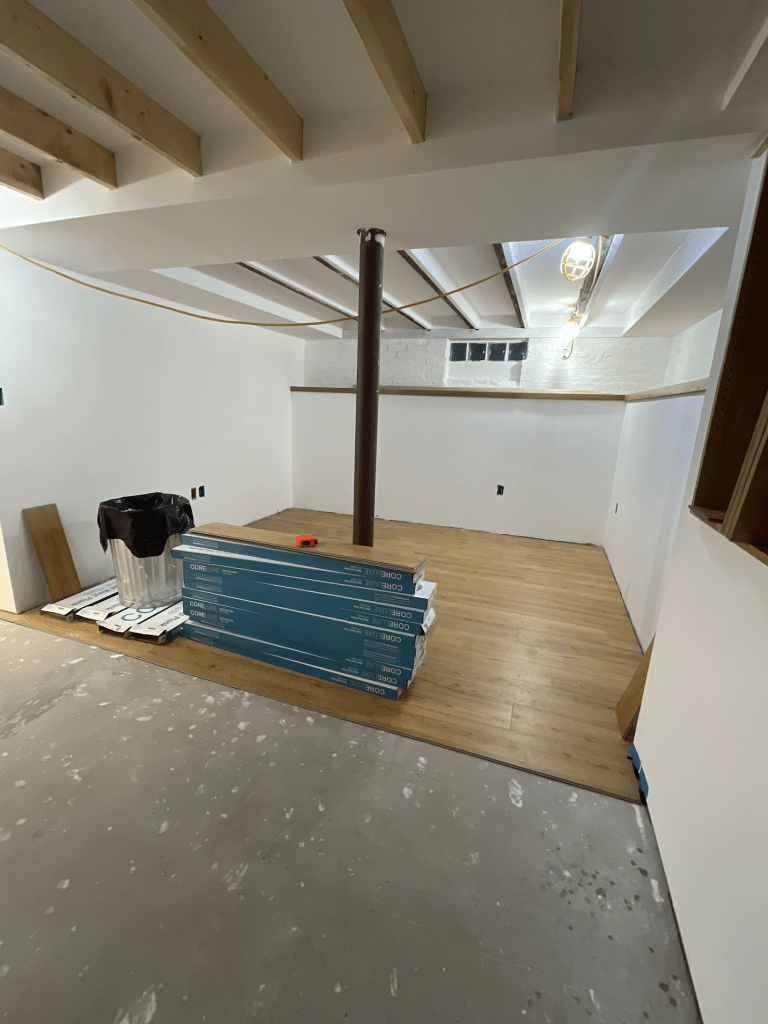
The table saw and chop saw made quick work of ripping and crosscutting the LVP, though this would have been doable with other tools. Here’s the finished floor:
Step 8. Finishing Touches
Once the floor is down, you can cover the gaps with baseboards. Rather than use what they sell in the baseboard section of Home Depot, I used 2″x6″ poplar stock. This produced a solid baseboard with a nice height, and it doesn’t look out of place even with the low ceilings:

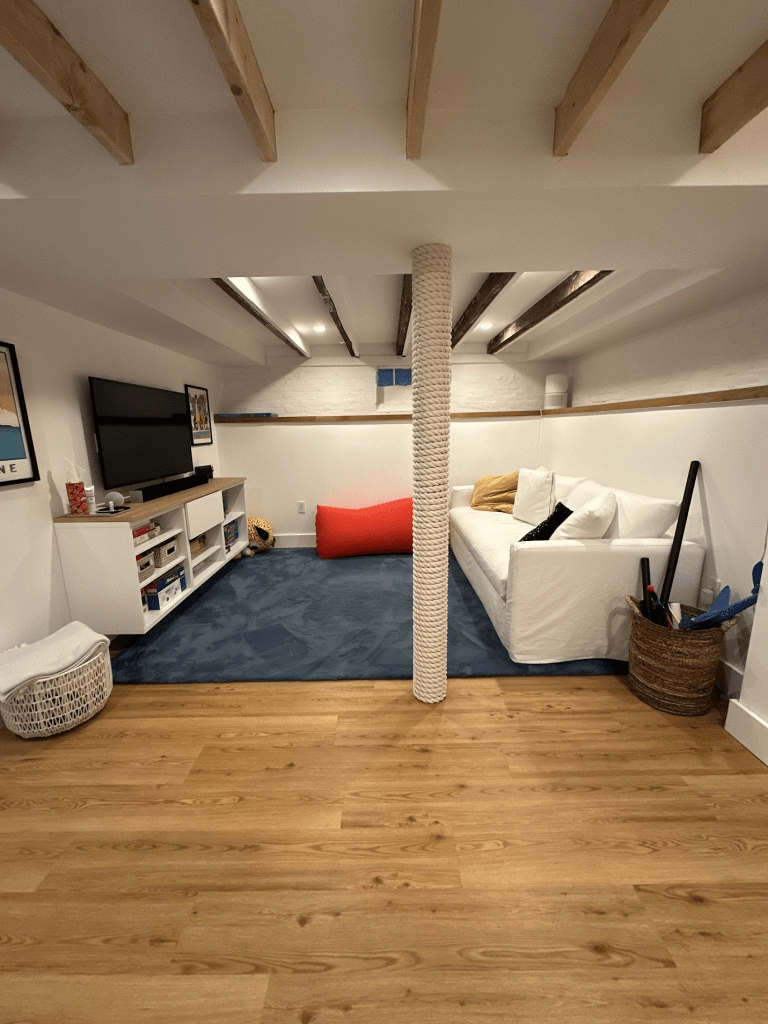
Step 9. Start Using Your Basement
Here it is, all filled with the things. The den turned out nicely as a place to nap, watch tv, fold laundry, and play video games, and we wrapped the remaining visible column with rope:
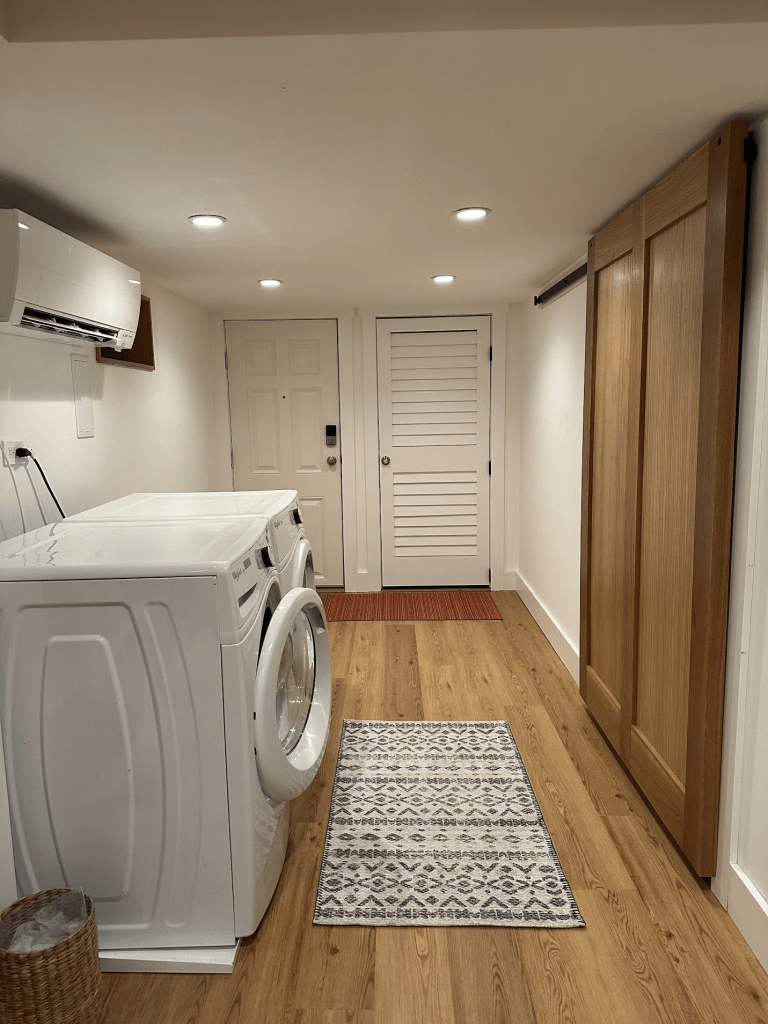
The laundry area is spacious, with plans still to build some sort of wood countertop:
And the under-stairs storage area became a place for gym equipment:

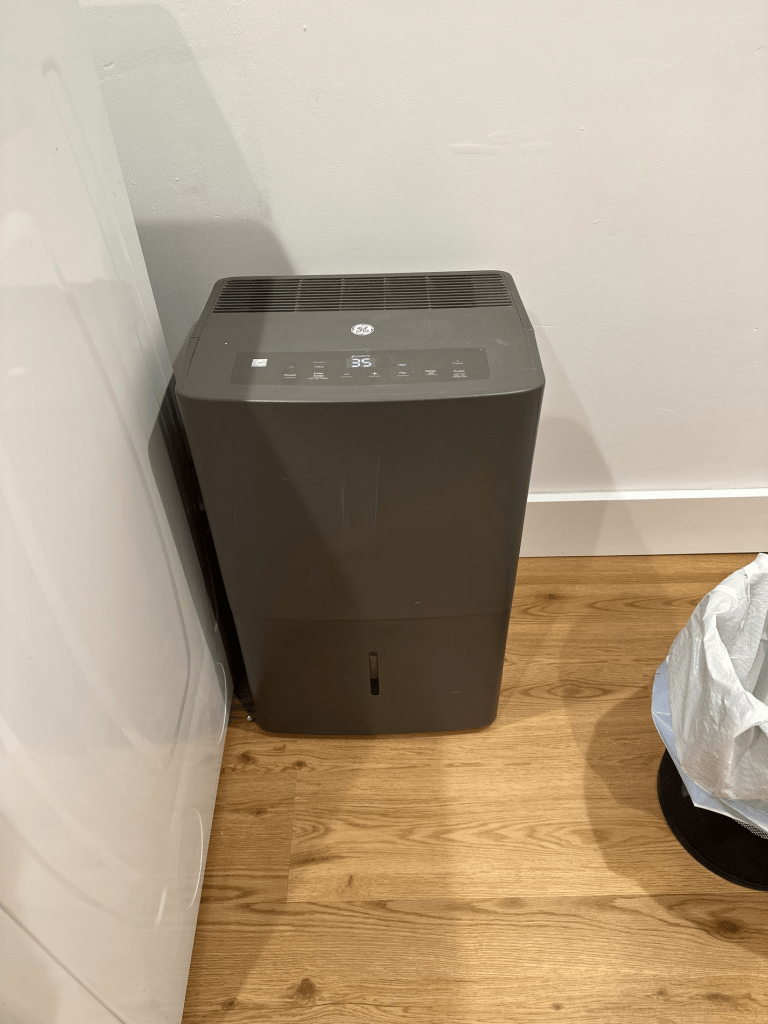
One last note. If you finish your basement, get a self-draining dehumidifier. I don’t know what the basement would be like without it because we’ve had it from the start, but I can attest that it has never felt the least bit moldy or damp:
Finally, much later, I finally built an oak barn door for the entrance to the workshop:

Thanks for reading!

Leave a comment